
This is the content of our poster session which appeared as part of the September 2003 AIHV Congress in London.
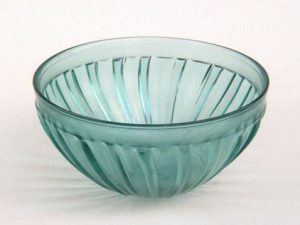
Ribbed Bowls and their ManufactureMark Taylor and David Hill |
|
|
The reproduction of Roman and Hellenistic glass requires a certain amount of experimentation. As a result of our work, we believe that the early glassmakers invariably made use of the quickest and simplest methods available. We suggest that ribbed bowl production techniques are no exception to this rule.
The following text and photographs describe and illustrate our methods: |
|
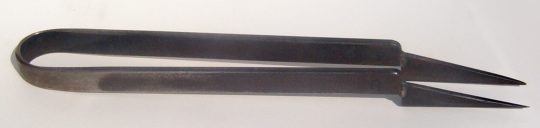
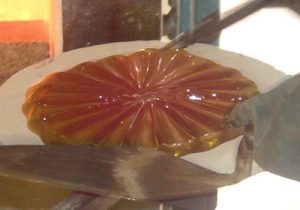
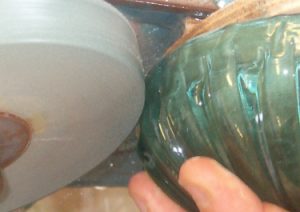
Hot-forming Stage:We form each rib individually on a hot, flat glass disc, using a pair of adapted pincers. This technique is a simple, relatively fast and repeatable method. |
|
|
|

|
To form and slump a monochrome ribbed bowl using this method usually takes us approximately 15 to 20 minutes. (A mosaic or polychrome vessel needs almost twice this length of time, since creating the initial glass disc demands the fusing of over one hundred separate component canes - see objects on table and description below).
|
|
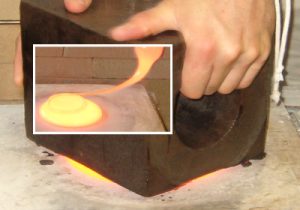
We pour molten glass from a gathering iron onto a ceramic marver which has been dusted with dry powdered clay, flatten the glass with a large, damp block of wood to form a disc, and transfer it onto a ceramic kiln batt for re-heating. The underside of the molten glass disc picks up some of the powdered clay, which acts as a separator during the next phases.
|
|
|
Working quickly with the pincers, we can usually pinch 4 or 5 ribs before the glass becomes too stiff and requires re-heating. As the number of ribs pinched grows, the amount of time those already made are exposed to the heat also increases. This can result in a certain amount of re-melting of these earlier pinched ribs, an effect sometimes seen on original vessels. If necessary, once a complete series of ribs has been pinched, we can reinforce them by pinching for a second time. |
|
During rib-pinching, the glass disc is prone to distortion, and requires adjustment with the pincers, stretching it back to a circular shape, and ensuring it is still the necessary diameter for the finished bowl. This is best done after the ribs have been formed, and at as low a temperature as possible. This helps to ensure that the ribs are not re-heated to the point where they start to re-melt.
|
|
|
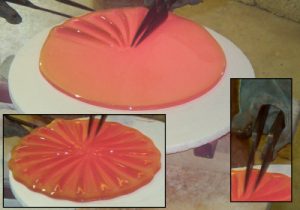
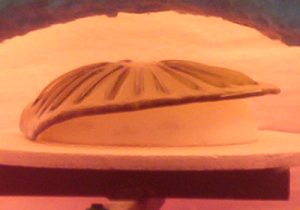
After pinching all of the ribs, we immediately place the hot disc onto a pre-heated form, and re-heat and slump the vessel. The softened disc is coaxed over the form using metal or wooden tools, until it meets the horizontal surface of the kiln batt and creates an even rim. Any areas which do not meet the batt may be teased downwards with the blade of the pincers. This usually results in nearly horizontal linear toolmarks in the form of slight indentations, which mirror those seen on some original bowls, despite grinding and finishing. |
|
|
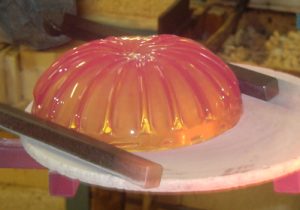
Following slumping, the region immediately below the rim of a ribbed bowl needs to be tooled in order to form the characteristic wider flattened ends of the ribs, and to ensure that all the ribs begin at the same distance below the rim. We do this by re-heating the bowl and applying two narrow metal bars at either side of the rim, turning the vessel as it is pressed. Several re-heats are necessary in order to complete this operation. The resulting folds, and the steep, sometimes flattened slopes at the tops of the ribs produce results very similar to those seen on original vessels. |
| These two operations are performed at as low a temperature as possible in order to preserve rib definition. | |
| Finally, we allow the bowl to cool slightly and stiffen, and remove it from the form prior to annealing. | |
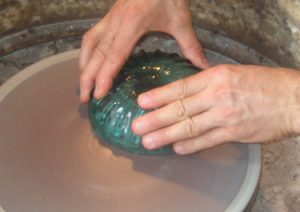
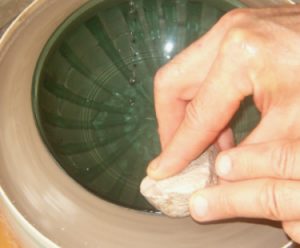
Cold-working Stage:After annealing and cooling, the bowl has to undergo cold glass working to remove all the partially fused deposits of clay separator from the inside of the vessel, and toolmarks on the outside. There are three distinct stages to this process: |
|
|
|
| 1. We grind the rim of the bowl flat and level using a flat-bed grinder. | |
| 2. We grind and polish the area above the ribs, steadying the bowl with a fixed wooden stock, and turning it against a grinding wheel in the traditional manner. | |
|
3. We mount the bowl in a bed of clay, secure it to a powered turntable (in this case, the flat-bed grinder), grind and polish the inside of the vessel, and cut any decorational horizontal grooves or bands. Traditional grinding materials such as sandstone and pumice (used here to polish the bowl) can be used. (Note that the bowl is being worked on from above, allowing full access to the inside and to the outside below the rim, which would not be possible if the bowl were mounted on a lathe). |
| The grinding and polishing stages can take up to 90 minutes, depending on the desired standard of finish. Varying qualities of finish can be seen on original vessels, but all display concentric grinding marks on their interiors, and usually above the ribs - see bowls on table. | |
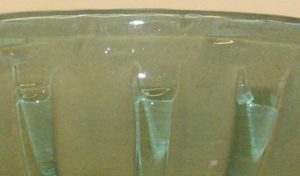
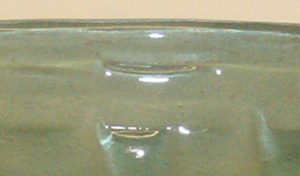
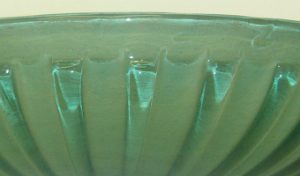
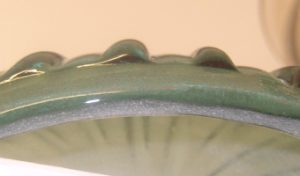
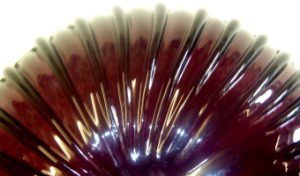
Details of Toolmarks:These pictures of bowls made by us show some of the toolmarks which are found on original ribbed bowls. |
|
|
Vertical tooling marks (right):
These are caused by the pincers digging into the hot glass when forming the ribs. |
|
|
Horizontal tooling marks (left):
These are made whilst pulling the rim of the hot glass bowl downwards to meet the batt. |
|
Top of rib (right):
This shows the flattening and shaping as a result of the bars pressing against the side of the bowl. |
|
|
Leaning of ribs: (left):
This is caused by holding the pincers at an angle whilst pinching the ribs. |
|
Serpentining: (right):
This slight S - shaped curvature of the ribs occurs naturally as a result of using the pincers to turn the disc whilst holding on to a rib. |
|
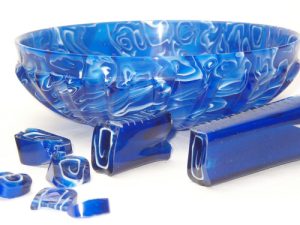
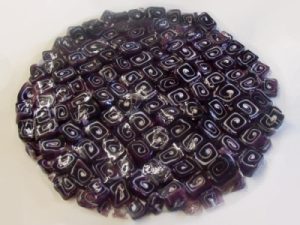
Canes With Spiral Patterns In Cross-Section:Many original wide, shallow ribbed bowls are formed using cross-sections of mosaic canes, often with a spiral pattern - see objects on table. |
|
|
These are formed by gathering the matrix glass (e.g. blue) and forming a tongue-shape, dipping the underside of the tongue onto the surface of the glass for the spiral (e.g. white), scraping off the excess using the rim of the pot, lengthening the tongue and rolling it into a spiral, reshaping it to a rectangular section and finally stretching it.
|
|
|
When annealed and cooled, the canes are cut into thin cross-sections and arranged on a ceramic kiln batt - see objects on table.
It takes about 10 minutes to make a cane, with three canes needed for each bowl. A further 30 minutes are needed to cut the canes and arrange the cross-sections. |
We are continuing our work on reproducing ribbed bowls, and constantly making and discovering refinements to the techniques outlined here.
A version of this presentation discussing further the hot-forming of ribbed bowls was first published in the Catalogue of Greek and Roman Glass in the British Museum: Non-blown and Early Blown Glass, by Veronica Tatton-Brown and William Gudenrath. (BMP 2003). |
|
Glass On Table(represented by photo) |
|
| 1. Tongue of blue glass with white glass gathered onto the underside | |
| 2. Tongue has been stretched | |
| 3. Spiral partly formed | |
| 4. Finished cane with spiral running through its length | |
| 5. Cane has been notched and some segments have been split from it | |

|
|
Please feel free to handle these objects(a good trick if you can do this online - but left in for completeness!) |
|
| Mark Taylor and David Hill 2003 |