
| ARCHIVE HOME | Grinding and Polishing |
The aim of the skilled cold glass worker is to create an attractive vessel from an unfinished blank, and there are several reasons for grinding and polishing such a vessel:
How is this accomplished? This is one area where a version of a potter’s wheel is likely to have been used, although higher speeds of rotation than usual potting speeds would be beneficial.
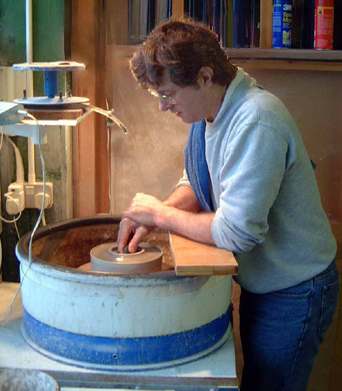
The easiest approach to grinding and polishing an open vessel is to set and centralise it horizontally on a turntable, feed water onto it from above and, using a rest to steady one’s arms and hands, apply hand-held grinding media to it whilst it rotates.
For all grinding and polishing operations, water must be used as a coolant and as a vehicle for cleaning glass dust away from the area being worked on.
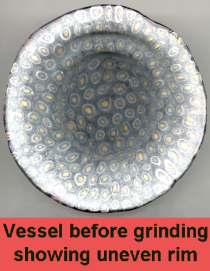
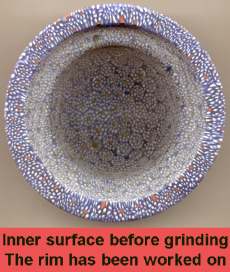
Before the main grinding operation the rim, if there is no network cane around it, has to be tidied. If working on a ribbed bowl, the tops of the ribs and the area above the ribs on the outside of the bowl can also be ground. For this stage a traditional cutting frame holding a vertically mounted cutting stone can be used, offering up the areas to be ground to the rotating wheel. (In this way a ribbed bowl can be prepared for the smoothing and polishing stages as described below, or its outside surface can be taken through to its final finish.)
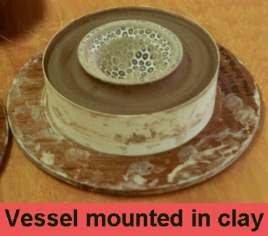
In order to mount the vessel on the turntable, we use a cut-down plastic bucket fixed to a circular board. The bucket is filled with clay and the board fixed to the turntable. The vessel is set in the clay, and is held in place by suction. At this stage it is important to centre the vessel. The clay is left to dry until it is leather-hard, enabling it to resist the force applied during cutting. When work is completed, the vessel is carefully extracted and the clay re-used. This is a straightforward way of mounting the glass, and a version of this could easily have been used for original vessels.
The grinding materials for glass available to the ancient craftsmen were carborundum, sandstones and pumice. Grinding speeds vary with the materials used and the size of the vessel. In general, slower speeds should be used for the initial roughing with coarser-grained stones, the objective being to shape the vessel by rapidly removing unwanted glass, progressing to higher speeds when smoothing and polishing using finer-grained stones. Coarser-grained carborundum and sandstones can be used for roughing, the finer-grained stones for smoothing and pumice for polishing.
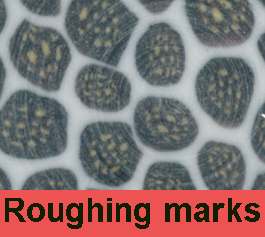
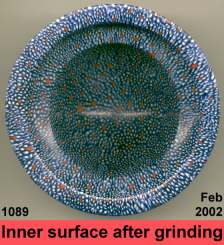
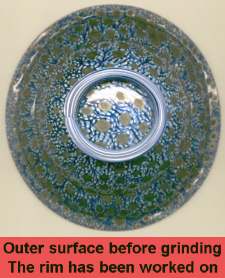
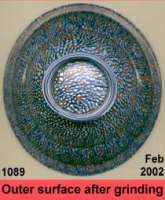
The quality of the finish depends upon how thoroughly each step of the process is performed. Unless the deeper scratches of the previous phase are properly removed during the next phase, they can appear on the final surface as white, concentric scratches. This is necessarily a time-consuming process. Using modern machinery and modern industrial diamond cutting media, grinding an inside surface may take up to thirty minutes, whilst an outside surface, including a footring and sharp changes of curvature such as those on a footed plate can take up to an hour.
The materials we use are silicon carbide stones, diamond pads, pumice and fine silicon carbide paper in a seven-stage process for each side. We create a finish which is of a higher quality than those on many original bowls (although some original ribbed bowls that we have seen do have a very high quality finish on them).
The experiments that we have done using traditional stones (silicon carbide, sandstone and pumice) show that to achieve a result approaching our normal finish requires about half as much time again. It is a job which needs patience, a steady hand and lots of practice, and as much as half of the time taken to make a vessel can be devoted to the cold-working stages.
The evidence for grinding and polishing using a method such as ours is seen in the form of fine concentric marks and lines which are sharply delineated. If these marks had been imparted using a mould or form, as has been suggested, we would expect to see a smooth, almost fire-polished finish on the surfaces of the vessel, as on 19th and 20th century pressed glass, created using hot metal moulds. We would also expect not to see deep scratch marks. If, as we believe, forms made from ceramic or core-forming material were used by ancient glassmakers for slumping vessels, the vessels would have to be ground and polished to remove all traces of this moulding material, the separator (if used), inconsistencies and tooling marks as detailed above. The final surface finish would then be the result of this process.
Mark Taylor and David Hill
| vitrearii @ romanglassmakers . co . uk | 0044 (0)1264 889688 |
Unit 11, Project Workshops, Lains Farm, Quarley, Andover, Hampshire SP11 8PX, UK